Summer fun on a budget!

Toronto can get pretty expensive, and being on a budget can often feel like there’s not a lot of things you can go out and enjoy. Resteraunts, movies, clubs, concerts…it all adds up. Not to mention family friendly events- I find things for kids are often crazy expensive.

That’s why I LOVE searching What’s on Toronto. Each week, it offers an excellent list of events happening  in Toronto. The great thing is, a lot of them are free (or very inexpensive) and some events are things you’d never know were happening if you didn’t just look for them.

For example, this Easter, a church near by us was having a little easter egg hunt along St. Clair between Bathurst and Christie. It was free, so we decided to walk up and check it out. It was pretty small and simple, but they had an easter bunny greeting the kids and taking pictures, some crafts, and each kid got a little prize. BK got some bubbles, which was the best thing ever to a toddler. 🙂

Here’s a great article that lists a bunch of free (or very frugal) things to do this summer: http://www.toronto.com/article/731478–free-or-cheap-things-to-do-in-toronto-this-summer

I’ll usually check out What’s on Toronto if I know Rob has the weekend off, so we can go and do something fun and inexpensive (or free!) as a family. It creates such great memories and it’s a nice change from the usual park trip (although, those are great too.) We’ll either head out in the mornings, or we’ll pack a lunch and stay all afternoon!

This weekend, I think we’ll check out the Big on Bloor festival! What are your weekend plans?

Butterflies!!!

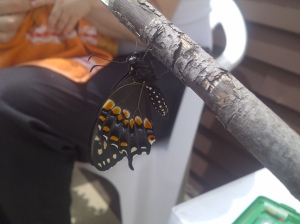
Two of our four cocoons hatched today!

I got a bit of a frantic phone call while BK and I were at the park this morning from Rob, saying that the butterflies are hatching and to come home asap! So, I scooped up BK (he wasn’t happy about leaving the park in a hurry) and we raced home to find two gorgeous butterflies!

Gorgeous, huh? We had so much fun watching them sun themselves and dry their wings! Bk loved watching the ‘Buddiefyies’ 🙂

Hopefully tomorrow the other two will hatch open!

Cateripllars!

Early this spring, I planted some dill (my third attempt) and it surprisingly took off! My intention was to use it for making my Oma’s pickle recipe, along with the cucumbers I planted (which have not taken off quite yet.). Anyways, last weekend, I noticed what I thought were tiny wasps chilling on my dill flowers, and upon further inspection, I realized they were little caterpillars. “OH NO…You’re not eating MY dill!”, I said. And I scooped them up and put them in our super cool bug container. (I figured BK would enjoy looking at them for a bit.)

Well, I looked them up on google and found out they turn into really pretty butterflies, so I decided it would be fun to keep them and raise them. (When BK is a little older, we’ll try this again and turn it into a little science lesson.)

So, the funny thing is, now I’ve fed them all my dill. (The very hungry caterpillars indeed!) These things eat A LOT!

It’s been fun learning about them and watching them change! They shed their skin (and face- ew.) so they can grow even bigger. I’m surprised at how big they’ve gotten in such a short time.

Pretty neat shot of this one shedding his skin and mask.

BK really liked watching the ‘buggies’ crawl around.

They started looking a little cramped in there, so I went to the dollar store and picked up 3 more homes (there’s 4 caterpillars in total)

I put a nice thick stick in each one, as well as some more dill, and they were all quite happy, I think, to have their own homes.

I’m glad I moved them when I did, because the next day, they started their chrysalis stage.

See him hanging from tiiiny ‘threads’? He did that for about a day, and then I checked on him in the morning, and twenty minutes later, he turned into the picture below!

And then about an hour later, he was fully covered and camouflaged into the stick.

Right now, all four of them are snugly in their cocoon. Once I knew they were all secure in there, I very carefully cleaned out the remaining dill and caterpillar droppings, so they’ll have a nice clean home to wake up to.

I’ll post any changes! They take about a week or so to fully transform! I can’t wait 🙂


Homemade Play dough

Last week, we spent quite some time indoors because it was just tooo hot. So, I needed some fun activities to do with BK to keep us both busy. I remembered the play dough cutting tools we scored from a yard sale the other week, so I decided to make him some dough to play with! I does really well with not putting sand and little things in his mouth, so I figured I could give it a try.

Here’s the recipe I used:

  • 1 Cup All Purpose Flour
  • 1/2 Cup Salt
  • 1 Cup Water
  • 1Tbsp Cooking Oil
  • 2Tsp Cream of Tartar
  • Food colouring of your choice

Put everything into a sauce pan. Stir over low/medium heat until a dough forms. Let cool, and play!

Just make sure you keep stirring, and scrape the bottom of the pan. That’s where the dough starts to form, and you don’t want to burn it 😉

 Super gooey! Don’t worry, once it cools, it’s not so sticky.

When not in use, store in an air tight container!


This was a huge hit with Bk!

Frugal Father’s Day Weekend!

Hope you all enjoyed celebrating Father’s Day with your loved ones. We had a pretty nice weekend!

Saturday, Rob had to work most of the day, so I took BK around the neighbourhood and checked out some garage sales. I scored this amazing, vintage Fisher Price chalkboard for $5!

Do you remember these?? I was so excited when I saw it, I zoned in and grabbed it!

That evening, after BK was in bed (Rob was home, don’t worry!) My friend and I walked past where the garage sale was, and they had left out everything they didn’t sell! It was a moving sale, so I guess they really didn’t want to bring these things with them- so I scored some more awesome stuff! Things I didn’t even see when I went earlier.

Amazing, right?! A toy piano, play-doh cutting set (no dough, but that’s cool, there’s all the cutting tools), a Melissa and Doug screw driver set with the tool box, a rolling toy thingy, a velcro game (top left- that fish), a bag for BK’s paints, and a ton of awesome books! There’s also a kid sized lawn chair and baby gate! All for free! So, always keep your eyes peeled!! You never know what you’ll find 🙂

Ahem. So, back to Father’s Day. We didn’t do gifts this year, Rob just wanted a nice dinner and time with the family. So I had BK paint him a card and a canvas:

I had him paint on acrylic paper, then after it dried, I cut the left side off, and folded it into a card. I had him draw a picture and ‘sign’ it too 🙂

His canvas for Daddy 🙂

After work, we met up with Rob and checked out the Taste of Little Italy festival going down on College St. There’s a LOT of yummy food there, but it gets pricey (and busy!) so we walked up to Bloor and grabbed some Ghazale’s! SO YUMMY. BK loved it too!

If you’re ever in Toronto, check them out. They have amazing food and you get a lot of food for what you pay.

And, speaking of food. I made Rob and amazing Father’s Day dinner! check back tomorrow for details!

Cheap Thrills

A couple of weeks ago, we had to take a looong car ride with BK to visit family. Car rides and toddlers can be a bad mix. So, I decided to make some quick car-friendly activities to bring along.

I made these during his nap right before the trip, so they aren’t beautiful, but they did the job!

Lacing cards:

  • You will need:
  • Cardboard
  • Scissors
  • Yarn or a Shoe Lace
  • Pencil and marker
  • Something to poke holes with

Gather your materials, I used the tabs from a cardboard box to make mine.

Lightly draw whatever shape you want your picture to be and make dots every few centimeters. You don’t want to add too many, because you want to keep the cardboard sturdy.

Carefully poke holes in the cardboard. Make sure not to bend the cardboard. Make the holes big enough for little ones to thread a lace through. I poked a hole with a pen and then widened them with the blade of my scissors.

Normally you’d be done here, but I didn’t have shoelaces with plastic ends, so I cut my yarn to the length I wanted and covered the ends with hot glue:

Done!

Sandpaper Letters:

You will need:

  • Cardboard
  • Light grade sandpaper
  • Paint
  • Paintbrush
  • Scissors
  • Glue

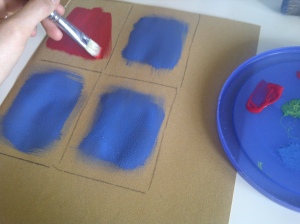
Cut out the number of cards you want to make. I made four. (A, B, C, and D) Then trace the cards onto your sandpaper for size and paint each square (I did red and blue, one for vowels and one for consonants)

(I did this a little backwards because I was rushing. But I’d suggest painting each square first, and then lightly drawing the letter on, once the paint has dried. I drew the letters first and then just painted the sandpaper and cut the letters out freehand)

Once dry, cut the letters out carefully, and glue onto the cardboard!

Mine look a little rough because, again, I was rushing during nap time, and I used the cardboard tab off a diaper box. I had to rip some glue off, which is why the B is a little messed up. However, if you want to make yours more durable, I’ve heard you can buy flat wooden chips at the hardware or craft stores. (You can also buy these letters in Montessori shops, but hey, we’re being frugal here!)

Colour Matching Clothes Pins:

You will need:

  • Paint chips (2 of each colour)
  • Clothes pins (the alligator kind, not the pegs)
  • Cardboard
  • Scissors
  • Glue

Start by gluing your paint chips onto the clothes pins.

While those are drying, glue your second set of paint chips to a piece of cardboard.

(if you’re a little anal, like me, trim the paint numbers off)

Once they’re all glued and dry, cut them out!

Write the name of the colour, if you like, and you’re done!

These activities, along with some books, colouring, dvds, and small toys, helped make the trip go much faster! These were also helpful at restaurant, to keep him busy. I think he’s still a bit young for some of these, but he enjoyed trying. I found pipe cleaner worked great for the ‘lacing’ activity, because he’s still a but small to figure out the yarn, but pipe cleaner is stronger and he enjoyed putting those through the holes.

Hope you found those tutorials fun and helpful!